Welcome to MrRobot5's Blog!
记录源码阅读心得、工作遇到的问题-
Spring Inter-bean injection 实现原理
Spring 基于 Java 配置方式,在Bean 有依赖配置的情况下,可以直接写成方法调用。框架背后的原理(magic🎭)是怎样的?
Injecting Inter-bean Dependencies 有哪些使用误区?
Injecting Inter-bean Dependencies
@Configuration
public class AppConfig {

    @Bean
    public BeanOne beanOne() {
         // dependency is as simple as having one bean method call another
         // 表面上是方法的直接调用,实际上是 Spring constructor injection
         // beanTwo 方法的调用,背后是 Spring Bean 创建和初始化的过程。
         return new BeanOne(beanTwo());
    }

    @Bean
    public BeanTwo beanTwo() {
        // 虽然是new instance, 但是多次调用 beanTwo 方法,得到的是同一个 instance
        // singleton scope by default
        return new BeanTwo();
    }
}
使用误区
-
有的开发者不理解 Inter-bean injection 的原理,理解为方法直接调用。会人工调用诸如 afterPropertiesSet 这样bean 初始化的方法,这样是没有必要的。
-
只有在 @Configuration 配置的类里,Inter-bean injection 才生效。
-
As of Spring 3.2, CGLIB classes have been repackaged under
org.springframework.cglib。 这些代码没有注释,需要去 CGLIB 查看。 -
@Configuration 类里的方法不能为private 或者 final,CGLIB 生成的继承类的规则限制。防止出现不生效的情况,Spring 会强制校验。
Configuration problem: @Bean method 'beanTwo' must not be private or final; change the method's modifiers to continue
Code Insight
①实现原理
容器启动时,对所有 @Configuration 注解的类进行动态代理(增强)。拦截类中的方法,对于 @Bean 注解的方法,会作为 factory-bean 方式对待,方法直接调用转化为 bean 获取的过程(get or create_and_get)。
动态代理使用 CGLIB 实现。
②关键类
-
org.springframework.context.annotation.ConfigurationClassEnhancer 动态代理 @Configuration 类。
-
org.springframework.context.annotation.ConfigurationClassPostProcessor 发起代理(增强)的入口。postProcessBeanFactory
③Source Code
经过上述的分析,源码查看侧重在 net.sf.cglib.proxy.MethodInterceptor。
/**
 * 拦截 @Bean 注解的方法,替换为 Bean 相关的操作(scoping and AOP proxying)。
 * @see ConfigurationClassEnhancer
 * @from org.springframework.context.annotation.ConfigurationClassEnhancer.BeanMethodInterceptor
 */
private static class BeanMethodInterceptor implements MethodInterceptor, ConditionalCallback {

	@Override
	@Nullable
	public Object intercept(Object enhancedConfigInstance, Method beanMethod, Object[] beanMethodArgs,
				MethodProxy cglibMethodProxy) throws Throwable {
		// 从proxy 获取BeanFactory。代理类有个属性 $$beanFactory 持有 BeanFactory 实例。
		ConfigurableBeanFactory beanFactory = getBeanFactory(enhancedConfigInstance);
		String beanName = BeanAnnotationHelper.determineBeanNameFor(beanMethod);

		// Determine whether this bean is a scoped-proxy
		if (BeanAnnotationHelper.isScopedProxy(beanMethod)) {
			String scopedBeanName = ScopedProxyCreator.getTargetBeanName(beanName);
			if (beanFactory.isCurrentlyInCreation(scopedBeanName)) {
				beanName = scopedBeanName;
			}
		}

		// To handle the case of an inter-bean method reference, we must explicitly check the
		// container for already cached instances.

		// 常规获取 Bean, beanFactory.getBean(beanName)
		return resolveBeanReference(beanMethod, beanMethodArgs, beanFactory, beanName);
	}

}
bean 构造和初始化,使用 method 定义的方法来实现。
/**
 * Read the given BeanMethod, registering bean definitions
 * with the BeanDefinitionRegistry based on its contents.
 * @from org.springframework.context.annotation.ConfigurationClassBeanDefinitionReader
 */
private void loadBeanDefinitionsForBeanMethod(BeanMethod beanMethod) {
	ConfigurationClass configClass = beanMethod.getConfigurationClass();
	MethodMetadata metadata = beanMethod.getMetadata();
	String methodName = metadata.getMethodName();

	// 获取 method @Bean 注解配置
	AnnotationAttributes bean = AnnotationConfigUtils.attributesFor(metadata, Bean.class);
	Assert.state(bean != null, "No @Bean annotation attributes");

	// Consider name and Register aliases...

	ConfigurationClassBeanDefinition beanDef = new ConfigurationClassBeanDefinition(configClass, metadata);
	beanDef.setResource(configClass.getResource());
	beanDef.setSource(this.sourceExtractor.extractSource(metadata, configClass.getResource()));

	if (metadata.isStatic()) {
		// static @Bean method 不依赖 configClass instance, 可以直接初始化为bean
		if (configClass.getMetadata() instanceof StandardAnnotationMetadata) {
			beanDef.setBeanClass(((StandardAnnotationMetadata) configClass.getMetadata()).getIntrospectedClass());
		}
		else {
			beanDef.setBeanClassName(configClass.getMetadata().getClassName());
		}
		beanDef.setUniqueFactoryMethodName(methodName);
	}
	else {
		// instance @Bean method 🎈🎈🎈
		beanDef.setFactoryBeanName(configClass.getBeanName());
		beanDef.setUniqueFactoryMethodName(methodName);
	}
	// beanDef.setAttribute...
	this.registry.registerBeanDefinition(beanName, beanDefToRegister);
}
总结
-
Spring 框架为了使用的方便,尽可能的隐藏了实现细节。让开发更加方便。
-
因为隐藏了技术细节,对于诸如上述的 Inter-bean dependency 配置方式,开发者可能会误解,会显示调用框架的接口。
-
这次分析AOP 的使用场景,又一次加深了动态代理的理解,眼前一亮。
-
通过AOP 方式对Bean-Method 代理,可以用 cache 使用的角度去理解。如果存在,从 beanFactory cache 获取并返回;如果不存在,则根据 Bean-Method 去创建bean, 并put 到beanFactory cache, 再返回。✨
-
-
Java 应用 CPU 使用率高排查思路
CPU 使用高一般原因是出现代码死循环。
寻找到死循环的代码,就需要找对应的 stack。
匹配JVM stack,就需要查找CPU 使用率高的进程/线程。
遵循上述思路,总结排查步骤。
排查步骤
-
查找java 进程id
# 获取java 进程信息。 eg: 进程id = 12309 jps -v -
查找 java 进程的线程 CPU 使用率
# -p 用于指定进程,-H 用于获取每个线程的信息 top -p 12309 -H -
获取java 进程的 stack
jstack -l 12309 > stack.log- 结合上述2 和 3 的结果,通过匹配线程id,获取对应的stack 详情
-
-
web 请求拦截方案和 chrome extensions
案例-浏览器请求增加自定义 Header
在项目开发过程中,需要给 web 请求统一添加 Header, 后端会根据是否有自定义Header 决定是否是超管权限。方便开发和线上调试。
通过使用 Chrome 插件,可以给每个 web 请求添加自定义 Header,并且不会影响正常工程代码。
插件名称:Modify-http-headers。
/**
 * 后端示意代码
 * 超管功能,登录PIN 替换,用于特殊场景的调试。 org.springframework.web.servlet.HandlerInterceptor
 */
@Slf4j
public class AuthInterceptor extends HandlerInterceptorAdapter {

    /**
     * 超管PIN header,仅用于调试
     */
    private static final String SUPER_PIN_HEADER = "super-pin";

    @Override
    public boolean preHandle(HttpServletRequest request, HttpServletResponse response, Object handler) throws Exception {
        String superPin = request.getHeader(SUPER_PIN_HEADER);
        // 如果Http 请求有自定义 Header, 并且当前用户属于超管, 可以进行登录用户替换。
        if (StringUtils.isNotBlank(superPin) && inWhiteList(getCurrentPin(request))) {
            AuthContext context = new AuthContext();
            context.setPin(superPin);
            setAuthContext(context);
        }
        return true;
    }
}
web 请求拦截方案
-
代码中编写, Jquery/ axios 都支持拦截器。
可以根据不同的运行环境,决定是否添加自定义的Header。
不建议这种方式,对代码有污染,还有安全隐患。
-
Fiddler
非常方便的Http 拦截代理工具。
-
Chrome extensions
浏览器插件实现功能注入和增强。借助 Chrome 提供的丰富API,可以实现各种想要的特性。
-
Chrome Source Override
本地调试很方便 使用Chrome开发者工具overrides实现不同环境本地调试
Chrome extensions
Extensions are software programs, built on web technologies (such as HTML, CSS, and JavaScript) that enable users to customize the Chrome browsing experience.
enhance the browsing experience✨
①插件开发相关
插件开发教程 Chrome Extension development basics - Chrome Developers
API 能力总览 Chrome Extension development overview - Chrome Developers
官方案例 Extensions - Chrome Developers
❤注意事项
-
manifest.json 是必备文件,用来声明和定义插件。
-
根据插件的需求,Chrome 插件分为Content scripts、Service worker、The popup 形式。
-
permission 声明非常重要。使用对应的API 能力,需要在manifest声明对应的权限。
-
快速打开插件管理
chrome://extensions -
可以使用console 和 开发者工具调试插件问题
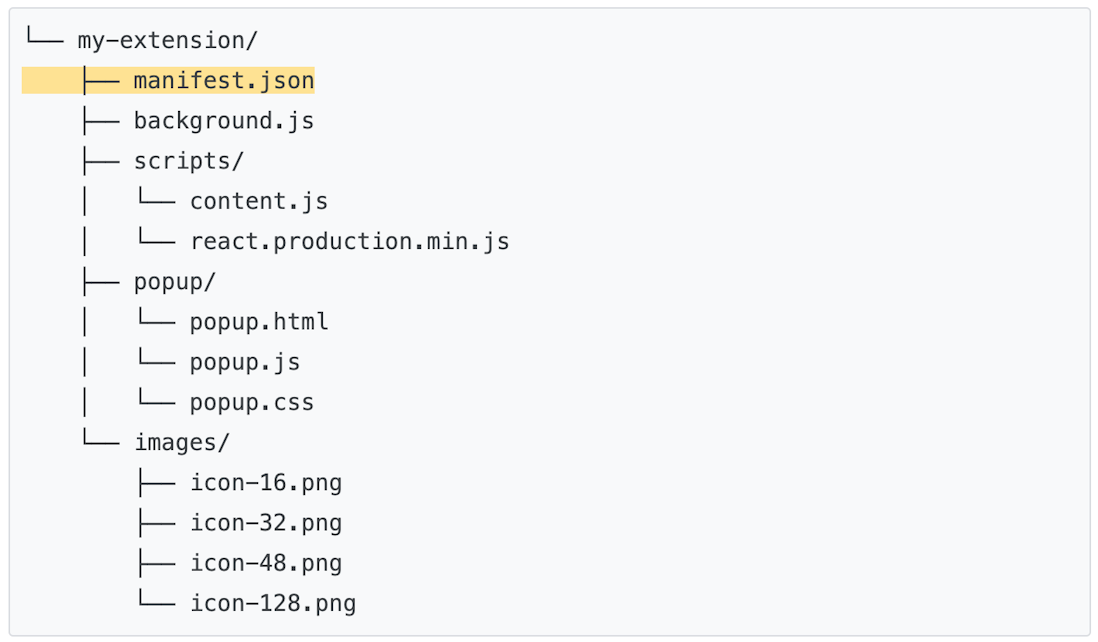
🧡插件推荐的工程结构
②chrome.webRequest
Use the
chrome.webRequestAPI to observe and analyze traffic and to intercept, block, or modify requests in-flight.上述案例拦截 web 请求,添加自定义 header 就是通过调用
chrome.webRequestAPI 实现。// 上述案例使用的插件 Modify-http-headers, 核心实现。 chrome.webRequest.onBeforeSendHeaders.addListener(function(details){ var headerInfo = JSON.parse(localStorage['salmonMHH']); for (var i = 0; i < headerInfo.length; i++) { details.requestHeaders.push({name: headerInfo[i].name, value: headerInfo[i].value}); } return {requestHeaders: details.requestHeaders}; }, filter, ["blocking", "requestHeaders"]); "requestHeaders"]);
-
-
SpringBootTest 使用过程中遇到的冷门问题
问题描述
使用SpringBootTest 测试DAO 逻辑时,直接报错:
java.lang.NoSuchMethodException: tk.mybatis.mapper.provider.base.BaseSelectProvider.<init>()从异常日志分析,是 tk.mybatis 的增强方法初始化问题。可是,启动工程调用该DAO 方法,是正常执行的,那么问题是出在哪呢?
@Slf4j
@RunWith(SpringRunner.class)
@SpringBootTest(classes = WebApplication.class)
public class ApplicationTests {

    @Autowired
    private DictionaryMapper dictionaryMapper;

    @Test
    public void baseMapperTest() {
        int count = dictionaryMapper.selectCount(null);
        Assert.assertTrue(count > 0);
    }

}
同时,测试目录下,还有一个空的SpringBootApplication,主要是用于纯Spring 容器的一些逻辑测试(不加载RPC接口、DAO, 不初始化Redis 等)
/src/test/java/com/foo/EmptyApplication.java
@Slf4j
@SpringBootApplication(scanBasePackages = "com.foo.service", exclude = {RedisAutoConfiguration.class, MybatisAutoConfiguration.class, RPCAutoConfiguration.class})
public class EmptyApplication {

}
问题分析
tk.mybatis 的异常
关于tk.mybatis 增强类初始化异常的问题,可以直接翻看之前的笔记可以解决。这里。
现在的问题是,只有在SpringBootTest 运行单测方法才会异常。推测是SpringBootTest 某种机制,导致MapperAutoConfiguration 没有loadClass 或者没有执行。
MapperAutoConfiguration 检测
通过查看DEBUG 日志,发现MapperAutoConfiguration 正常load,只是因为不符合匹配条件,没有注册到Spring 容器,所以没有正常执行初始化。
 MapperAutoConfiguration:
   Did not match:
     - @ConditionalOnBean (types: org.apache.ibatis.session.SqlSessionFactory; SearchStrategy: all) did not find any beans (OnBeanCondition)
通过源码,我们可以看到,明明指定了加载顺序,为什么会匹配失败?
@ConditionalOnBean(SqlSessionFactory.class)
@AutoConfigureAfter(MybatisAutoConfiguration.class)
public class MapperAutoConfiguration {
}
EnableAutoConfiguration 加载顺序
根据之前的Insight 笔记,可以直接跳到 org.springframework.boot.autoconfigure.EnableAutoConfigurationImportSelector#getCandidateConfigurations
通过断点调试分析,发现上述提到的EmptyApplication 也load 到容器中了,由于配置了exclusions,直接剔除了MybatisAutoConfiguration。容器中的EnableAutoConfiguration 组件集合是两个SpringBootApplication 扫描结果的合并。这样看来,确实是没法保障初始化顺序。
那么问题又来了,我们的SpringBootTest 明确指定了启动配置类,为什么EmptyApplication 也会掺和进来?
SpringBootApplication 加载过程
通过源码分析,springboot 是以WebApplication 作为启动类。
但是,由于EmptyApplication 属于 Configuration,在初始化过程中,正常加载到容器中。这时候容器中就存在两个 SpringBootApplication。自动配置等组件也是这两个 Application 共同扫描的集合。
关键信息
-
SpringBootApplication 声明并启用了EnableAutoConfiguration。
-
EnableAutoConfiguration 是通过EnableAutoConfigurationImportSelector 来实现的。
-
上述EnableAutoConfiguration 加载就是EnableAutoConfigurationImportSelector 执行扫描导入实现的。
相关的源码逻辑
/**
 * Build and validate a configuration model based on the registry of
 * Configuration classes.
 * @see org.springframework.context.annotation.ConfigurationClassPostProcessor#processConfigBeanDefinitions
 */
public void processConfigBeanDefinitions(BeanDefinitionRegistry registry) {

    // Parse each @Configuration class
    ConfigurationClassParser parser = new ConfigurationClassParser(
            this.metadataReaderFactory, this.problemReporter, this.environment,
            this.resourceLoader, this.componentScanBeanNameGenerator, registry);

    do {
        // parse 过程中,引入EmptyApplication。由于EmptyApp 指定exclude MybatisAutoConfiguration,在两次排序合并后,添加到了最后。打乱了 EnableAutoConfiguration 的顺序。
        parser.parse(candidates);
        parser.validate();
    }
}
总结
-
最复杂的问题,原因总是很简单。
-
这个问题与环境没有关系,与 SpringBootTest 也没有关系,是 SpringBoot 加载机制的问题。
-
工程里尽量不要写多个 SpringBootApplication ,避免不必要的麻烦。目前使用的版本:spring-boot-autoconfigure-1.5.10.RELEASE
-
-
Spring Boot DataSource 知识梳理
梳理 Spring Boot 默认配置的数据库和连接池,以及自定义配置的方法
database
Spring Boot gives you defaults on all things. For example, the default database is H2.
Consequently, when you want to use any other database, you must define the connection attributes in the application.properties file.
①default
# org.springframework.boot.autoconfigure.jdbc.EmbeddedDatabaseConnection#H2
# 内嵌数据库支持 H2 Derby Hsqldb,首选 H2。
spring.datasource.url=jdbc:h2:mem:%s;DB_CLOSE_DELAY=-1;DB_CLOSE_ON_EXIT=FALSE
spring.datasource.username=sa
spring.datasource.password=
spring.datasource.driver-class-name=org.h2.Driver
②自定义
spring.datasource.url=jdbc:mysql://${MYSQL_HOST:localhost}:3306/db_example
spring.datasource.username=springuser
spring.datasource.password=ThePassword
spring.datasource.driver-class-name=com.mysql.cj.jdbc.Driver
#spring.jpa.show-sql: true
③Code Insight
/**
 * 查找最匹配的 EmbeddedDatabaseConnection
 * Spring Boot 内置EmbeddedDatabaseConnection 配置。作为 DataSourceProperties 托底配置。
 * 如果没有指定的DatabaseConnection,就会取 EmbeddedDatabaseConnection。
 * @see org.springframework.boot.autoconfigure.jdbc.DataSourceProperties
 * @see org.springframework.boot.autoconfigure.jdbc.EmbeddedDatabaseConnection
 */
public static EmbeddedDatabaseConnection get(ClassLoader classLoader) {
	if (override != null) {
		return override;
	}
	// 按照定义顺序,遍历 H2 Derby Hsqldb
	for (EmbeddedDatabaseConnection candidate : EmbeddedDatabaseConnection.values()) {
		// 如果存在数据库 DriverClass,就返回对应数据库的 Connection
		if (candidate != NONE && ClassUtils.isPresent(candidate.getDriverClassName(), classLoader)) {
			return candidate;
		}
	}
	return NONE;
}