Welcome to MrRobot5's Blog!
记录源码阅读心得、工作遇到的问题-
Insight H2 database 数据查询核心原理
本文目标是:了解查询的核心原理,对比 SQL 查询优化技巧在 h2database 中的落地实现。
前提:为了贴近实际实际,本文 Code Insight 基于 BTree 存储引擎。
数据查询核心原理
数据库实现查询的原理:遍历表/索引,判断是否满足
where筛选条件,添加到结果集。简单通用。对于选择表还是索引、如何遍历关联表、优先遍历哪个表、怎样提升遍历的效率,这个就是数据库查询复杂的地方。
/**
 * 查询命令实现查询的主要过程
 * @see org.h2.command.dml.Select#queryFlat
 */
private void queryFlat(int columnCount, ResultTarget result, long limitRows) {
    // 遍历单表 or 关联表。topTableFilter 可以简单理解为游标 cursor。
    while (topTableFilter.next()) {
        // 判断是否符合 where 筛选条件
        if (condition == null || Boolean.TRUE.equals(condition.getBooleanValue(session))) {
            Value[] row = new Value[columnCount];
            // 填充select 需要的 columns ①
            for (int i = 0; i < columnCount; i++) {
                Expression expr = expressions.get(i);
                row[i] = expr.getValue(session);
            }
            // 保存符合条件的数据,这个对应 resultSet
            result.addRow(row);
            // 没有 sort 语句的情况下,达到 limitRows, 终止 table scan ②
            if ((sort == null || sortUsingIndex) && limitRows > 0 &&
                    result.getRowCount() >= limitRows) {
                break;
            }
        }
    }
}
Join 查询核心原理
基于状态机模式,实现多表嵌套循环遍历。
使用的 Join 算法是: Nested Loop Join。
状态变迁:BEFORE_FIRST –> FOUND –> AFTER_LAST
/**
 * Check if there are more rows to read.
 * 遍历的数据 row 记录在当前 session 中,随时随地可以获取
 *
 * @return true if there are
 * @see org.h2.table.TableFilter#next
 */
public boolean next() {
    // 遍历结束,没有符合的条件的 row
    if (state == AFTER_LAST) {
        return false;
    } else if (state == BEFORE_FIRST) {
        // cursor 遍历初始化, 如果基于索引的游标,则可以提前锁定数据范围。③
        cursor.find(session, indexConditions);
        if (!cursor.isAlwaysFalse()) {
            // 如果包含 join 表,重置关联表的状态机。
            if (join != null) {
                join.reset();
            }
        }
    } else {
        // state == FOUND || NULL_ROW 的情况
        // 嵌套遍历 join 关联表。这是个递归调用关联表的过程。
        if (join != null && join.next()) {
            return true;
        }
    }
    // 表/索引数据扫描,匹配filterCondition,直到找到符合的 row
    while (true) {
        if (cursor.isAlwaysFalse()) {
            state = AFTER_LAST;
        } else {
            if (cursor.next()) {
                currentSearchRow = cursor.getSearchRow();
                current = null;
                state = FOUND;
            } else {
                state = AFTER_LAST;
            }
        }
        // where 条件判断
        if (!isOk(filterCondition)) {
            continue;
        }
        // 嵌套遍历 join 关联表。主表的每一行 row,需要遍历关联子表一次。④
        if (join != null) {
            join.reset();
            if (!join.next()) {
                continue;
            }
        }
        // check if it's ok
        if (state == NULL_ROW || joinConditionOk) {
            return true;
        }
    }
    state = AFTER_LAST;
    return false;
}
获取查询数据
从遍历的 row 中,获取 select 语句需要的 column 数据。
对应的 Cursor 实现是:org.h2.index.PageBtreeCursor
/**
 * 根据 columnId 获取对应的值
 * @see org.h2.table.TableFilter#getValue
 */
public Value getValue(Column column) {
	if (current == null) {
		// 优先从当前遍历的 row 获取数据。
        // 如果是索引中的 row,不会包含所有的行,会有取不到的情况
		Value v = currentSearchRow.getValue(columnId);
		if (v != null) {
			return v;
		}
        // 如果没有,再尝试从原始表 row 存储中获取数据。⑤
        // 对应的实现: currentRow = index.getRow(session, currentSearchRow.getKey());
		current = cursor.get();
		if (current == null) {
			return ValueNull.INSTANCE;
		}
	}
	return current.getValue(columnId);
}
常用的 SQL 查询优化技巧
分别对应上述源代码注释的数字角标。
①避免使用 SELECT *:只选择需要的列
如果使用 select *, 即使使用了索引查询。也需要取原数据行的所有数据(⑤)。会进行数据的二次读取,也就是回表查询。影响了性能。
②避免使用 ORDER BY, 尽量使用LIMIT
使用 LIMIT:如果只需要部分结果,可以使用 LIMIT 子句限制返回的行数,避免检索整个结果集。
如上源代码,如果没有 Order By,有limit 限制情况下,可以中途结束表遍历。
如果有 Order By 的情况下,肯定要执行完成整个扫描遍历的过程,最终在 result 结果集中再一次进行排序计算。
③使用索引:确保表中的列上有适当的索引,以加快查询速度。
如果使用索引,在初始化扫描阶段,会给 cursor 一定的范围,避免全表扫描。极大的缩小的查询范围。
④减少连接的表的数量:如果可能,尽量减少查询中的表的数量。
无需多言,嵌套递归查询,理论上是所有表的笛卡尔积。
⑤使用覆盖索引:一个查询的所有列都包含在索引中。
这样查询可以只扫描索引而不需要回表。例如,如果你的查询是 SELECT id, name FROM users WHERE age = 30,那么在 age, id, name 上创建一个复合索引可以避免回表。
其他
Nested Loop Join
// 用伪代码表示,可以更清晰理解上述 join 遍历的过程
for (r in R) {
    for (s in S) {
        if (r satisfy condition s) {
            output <r, s>;
        }
    }
}
MySQL 中的Nested Loop Join
MySQL官方文档中提到,MySQL只支持Nested Loop Join这一种join algorithm.
MySQL resolves all joins using a nested-loop join method.
This means that MySQL reads a row from the first table, and then finds a matching row in the second table, the third table, and so on.
-
SpringMVC 文件上传相关源码梳理
记录 SpringMVC 文件上传相关源码梳理
示例代码
@Controller
public class FileUploadController {

    @PostMapping("/form")
    public String handleFormUpload(@RequestParam("name") String name,
            @RequestParam("file") MultipartFile file) {

        if (!file.isEmpty()) {
            byte[] bytes = file.getBytes();
            // store the bytes somewhere
            return "redirect:uploadSuccess";
        }
        return "redirect:uploadFailure";
    }
}
Commons FileUpload
Form-based File Upload in HTML 定义,Commons FileUpload 是该定义的实现。
tomcat-embed-core
SpringBoot 项目中引用了
tomcat-embed-core,这个包内部打包了 Commons FileUpload。从 web 容器层提供了文件上传的支持。/** * 调用 Commons FileUpload, 实现 http 提交文件的解析 * 对应上述using 教程的 The simplest case * @see org.apache.catalina.connector.Request#parseParts */ private void parseParts(boolean explicit) { // Create a new file upload handler DiskFileItemFactory factory = new DiskFileItemFactory(); try { factory.setRepository(location.getCanonicalFile()); } catch (IOException ioe) { parameters.setParseFailedReason(FailReason.IO_ERROR); partsParseException = ioe; return; } factory.setSizeThreshold(mce.getFileSizeThreshold()); ServletFileUpload upload = new ServletFileUpload(); upload.setFileItemFactory(factory); upload.setFileSizeMax(mce.getMaxFileSize()); upload.setSizeMax(mce.getMaxRequestSize()); }SpringMVC 处理流程
StandardServletMultipartResolver
Auto-configuration for multi-part uploads.
protected void doDispatch(HttpServletRequest request, HttpServletResponse response) throws Exception {
    boolean multipartRequestParsed = false;
    try {
        ModelAndView mv = null;
        Exception dispatchException = null;

        try {
            // 判断当前的请求是否为文件上传。如果是,当前的request 转为 multipart request。
            // 如果不是,返回入参的 request。
            processedRequest = checkMultipart(request);
            multipartRequestParsed = (processedRequest != request);
            // 处理当前的请求...
        }
    } finally {
        // Clean up any resources used by a multipart request.
        if (multipartRequestParsed) {
            // 简单来讲,就是 request.getParts().delete();
            cleanupMultipart(processedRequest);
        }
    }
}
SpringBoot 配置
spring:
  servlet:
    multipart:
      # max-file-size specifies the maximum size permitted for uploaded files. The default is 1MB
      max-file-size: 32MB
      max-request-size: 32MB
MultipartAutoConfiguration
Auto-configuration for multi-part uploads.
@see org.springframework.boot.autoconfigure.web.servlet.MultipartAutoConfiguration
MultipartAutoConfiguration 负责注册 StandardServletMultipartResolver Bean。
DispatcherServlet 初始化过程中会尝试获取该 Bean。
/**
 * DispatcherServlet 初始化 multipartResolver。如果能获取到bean,支持文件上传解析,否则不支持。
 * @see org.springframework.web.servlet.DispatcherServlet#initStrategies
 */
private void initMultipartResolver(ApplicationContext context) {
    try {
        this.multipartResolver = context.getBean(MULTIPART_RESOLVER_BEAN_NAME, MultipartResolver.class);
    }
}
/** * Max file size .* 如果不配置 max-file-size,默认为 1MB,来源于此 * @see org.springframework.boot.autoconfigure.web.servlet.MultipartProperties */ private DataSize maxFileSize = DataSize.ofMegabytes(1);StringToDataSizeConverter
配置文件解析,字符串“32MB” 转为 DataSize 对象。
org.springframework.boot.convert.StringToDataSizeConverter
/**
 * DataSize 格式定义。
 * ^ $匹配字符串的开头和结尾,严格匹配整个字符串。
 * ([+\\-]?\\d+) 匹配一个可选的正负号后跟着一或多个数字
 * ([a-zA-Z]{0,2}) 匹配零到两个字母(大小写不限)
 */
Pattern.compile("^([+\\-]?\\d+)([a-zA-Z]{0,2})$");
-
Mybatis 分页插件 JDK 动态代理案例分析
背景
工程A 代码迁移到 工程B 过程中,涉及到分页插件的附带迁移和融合。
工程B 已有 com.github.pagehelper.PageInterceptor、 com.baomidou.mybatisplus.extension.plugins.inner.PaginationInnerInterceptor 前提下。
引入了另外一个分页插件 com.foo.common.interceptor.PaginationInterceptor
运行时异常
调用 PaginationInterceptor 分页插件时,报错如下:
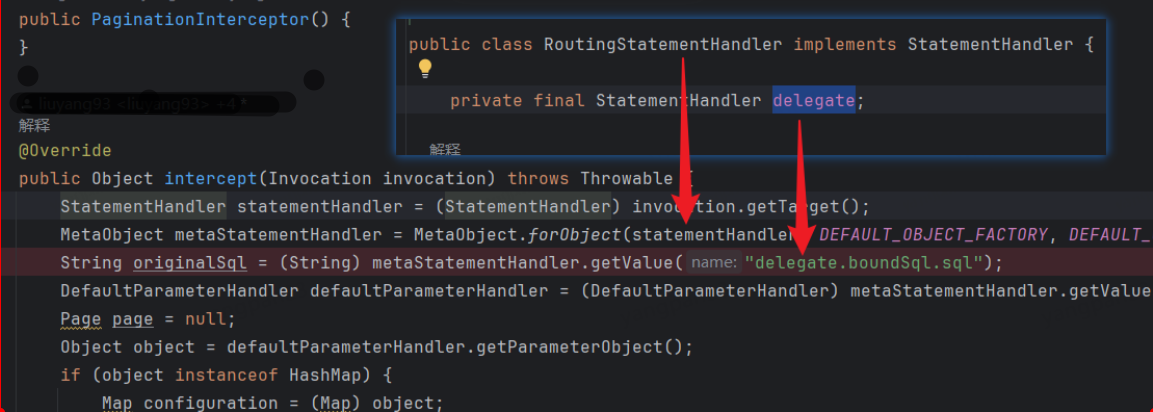
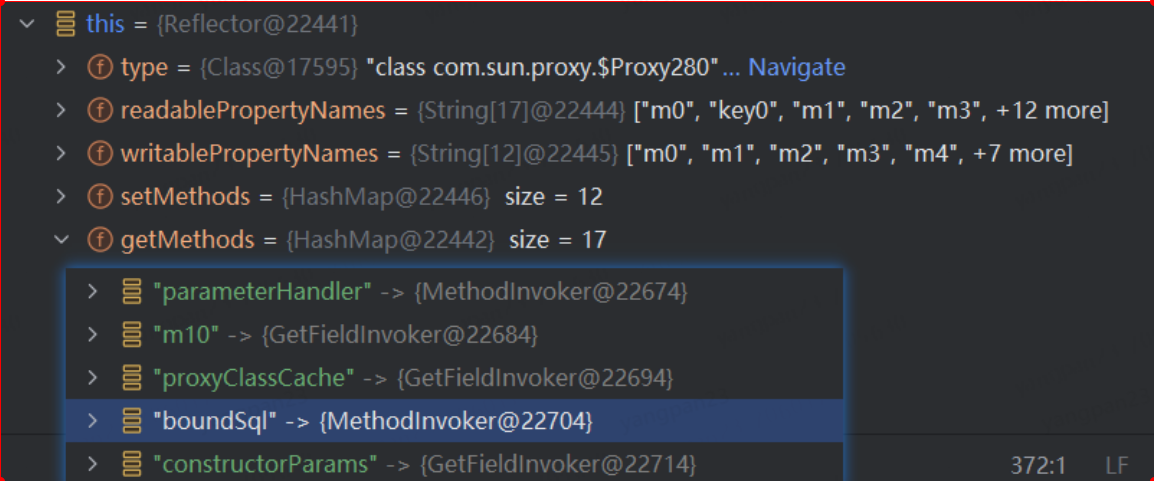
Caused by: org.apache.ibatis.reflection.ReflectionException: There is no getter for property named ‘delegate’ in ‘class com.sun.proxy.$Proxy280’
分页插件 PaginationInterceptor

Debug 运行环境差异
没有经过代理的对象-工程A 环境

经过代理的对象-工程B 环境

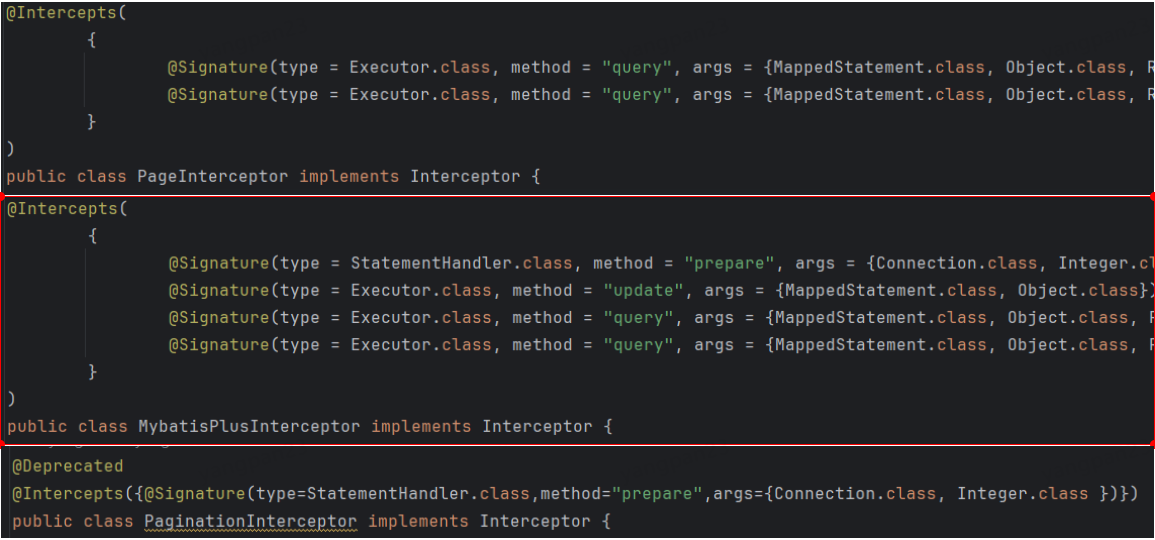
动态代理分析
分页插件 Pointcut

-
混合 Mybatis 分页插件集成适配探索
在工程服务化拆分过程中,由于不同工程配置差异,基础服务工程融合功能使用 Mybatis 插件有3个。为了集成、调和这些插件,遇到一些问题并总结思考。
问题场景
1️⃣插件列表
基础服务工程原有 Mybatis 分页插件:
com.baomidou.mybatisplus.extension.plugins.inner.PaginationInnerInterceptor
后续引入的分页插件:
-
com.github.pagehelper.PageInterceptor 常用的开源分页插件
-
com.foo.interceptor.PaginationInterceptor 内部实现的分页插件
2️⃣分页插件配置和使用
问题就出在内部实现的分页插件 PaginationInterceptor,非常的定制化,集成和适配带来很多问题。
@Configuration
public class MybatisPlusConfig {

   // 工程原有的分页插件配置
   // 使用该插件,必须在Mapper 方法中显示声明 IPage 参数,没有 pagehelper 灵活。
   @Bean
    public MybatisPlusInterceptor mybatisPlusInterceptor() {
        MybatisPlusInterceptor interceptor = new MybatisPlusInterceptor();
        interceptor.addInnerInterceptor(new PaginationInnerInterceptor(DbType.MYSQL));
        return interceptor;
    }

}
<!-- 利用 PageHelperAutoConfiguration 加载机制,自动注册分页插件 --> <dependency> <groupId>com.github.pagehelper</groupId> <artifactId>pagehelper-spring-boot-starter</artifactId> <version>1.3.0</version> </dependency><!-- 常规 Mybatis plugin 配置 --> <!-- PaginationInterceptor 分页针对的是 offset、limit 格式的分页参数,与常规的分页方式格格不入 --> <configuration> <plugins> <plugin interceptor="com.foo.interceptor.PaginationInterceptor"> </plugins> </configuration>PaginationInterceptor 分页实现思路,简直是灾难 🙉
3️⃣为什么不能合并❓
首先,工程服务的迁移是首要目标,上述分页插件使用方式各不相同,如果改写查询方法,耗时较久、浪费人力。
其次,插件的存在就是为了解决批量、共性功能需求存在。分页插件使用节省大量低效开发时间。
综合以上,决定继续引入和集成 PaginationInterceptor。
-
-
Mybatis 配置差异引发的问题
我就是把功能代码从 A 工程 copy 到 B 工程,怎么就报错了呢?
问题场景
代码功能:从数据库查询数据集合,翻译枚举字段
signStatus。运行到第4行报错。// 使用 Mybatis 查询数据集合 ① List<SomeData> data = fooMapper.selectList(someParam); for (SomeData item : data) { // throw NullPointerException ② model.setSignStatusDesc(SignStatusEnum.getDescByValue(item.getSignStatus())); } @Data public class SomeData { /** * 签到状态,默认值为 0 🎈 */ private Integer signStatus = 0; } // 枚举翻译类,接收参数类型 int ③ public static String getDescByValue(int value){ for (SignStatusEnum signStatusEnum : SignStatusEnum.values()){ if (value == signStatusEnum.getValue()) { return signStatusEnum.getDesc(); } } return ""; }① Mybatis 对应的 SQL 查询到的数据,
sign_status字段确实是 null② Mybatis 组装完的对象 item,调用枚举翻译类转中文时,报错 NullPointerException
③ 翻译方法的入参为原始类型 int, item.getSignStatus() 返回类型为 Integer ,会自动拆箱,null 值拆箱,就会触发 NullPointerException。
代码在 A 工程里,运行正常,并没有报错。到 B 工程里,signStatus 默认值被覆盖为 null, 那是什么问题 ❓
Code Insight
经过上述的分析和排查,相同的代码和数据,唯一的区别是运行的工程环境不同。
那问题应该就处在 Mybatis ORM 的处理阶段。
根据之前 Code Insight 记录【Mybatis 内嵌 resultMap 工作原理】,直接定位到返回类初始化的源码。
/**
 * PROPERTY MAPPINGS
 *
 * @param metaObject MyBatis 框架包装类,方便处理对象属性的读写操作。
 * @see DefaultResultSetHandler#applyPropertyMappings(ResultSetWrapper, ResultMap, MetaObject, ResultLoaderMap, String)
 */
private boolean applyPropertyMappings(ResultSetWrapper rsw, ResultMap resultMap, MetaObject metaObject, ResultLoaderMap lazyLoader, String columnPrefix) throws SQLException {
	// Mybatis 动态SQL resultMap 映射集合
	final List<ResultMapping> propertyMappings = resultMap.getPropertyResultMappings();
	for (ResultMapping propertyMapping : propertyMappings) {
		if (propertyMapping.isCompositeResult()
				|| (column != null && mappedColumnNames.contains(column.toUpperCase(Locale.ENGLISH)))
				|| propertyMapping.getResultSet() != null) {
			// 获取数据库对应列的值
			Object value = getPropertyMappingValue(rsw.getResultSet(), metaObject, propertyMapping, lazyLoader, columnPrefix);
			// 赋值操作,此处有 CallSettersOnNulls 配置判断 ④
			if (value != null || (configuration.isCallSettersOnNulls() && !metaObject.getSetterType(property).isPrimitive())) {
				// gcode issue #377, call setter on nulls (value is not 'found')
				metaObject.setValue(property, value);
			}
		}
	}
	return foundValues;
}
④ 如果 select sign_status 有值,那么就赋值到 signStatus,替换默认值 0。如果启用 CallSettersOnNulls 配置,属性类型非原始类,即使是 null, 也会赋值到 signStatus。
Mybatis CallSettersOnNulls
根据上述的源码分析,应该是 CallSettersOnNulls 配置的影响。在 B 工程中,确实有这个配置,删除该配置项,代码运行正常。
参考资料:
[MyBatis 3 配置](https://mybatis.org/mybatis-3/zh/configuration.html#%E8%AE%BE%E7%BD%AE%EF%BC%88settings%EF%BC%89)