Welcome to MrRobot5's Blog!
记录源码阅读心得、工作遇到的问题-
分布式事务- XA 模式与 atomikos 框架浅析
最近在看 H2 数据库的实现原理,竟然支持 XA 协议。正好顺路对分布式事务温习下,感觉无用的知识又增加了。
通过学习分布式事务的解决方案,积累分布式设计和开发的经验,举一反三。
国内使用较多的 mysql ,在 XA 协议的支持上一般,同时两阶段提交的方案在性能上和实现上都有一定的困难,因此可以称之为“无用的知识”。另一方面,从 atomikos 商业版的定价上看,真正的大公司才用得起,一般公司用不起也没必要这么用。
行业内比较实用的方案:事务消息+最终一致性。
分布式事务-XA模式
XA 两阶段提交流程如下:
sequenceDiagram participant TM as 事务协调者 TM participant RM1 as 资源管理器 RM1 participant RM2 as 资源管理器 RM2 Note over TM,RM2: 第一阶段 Prepare TM->>RM1: xa_prepare RM1-->>TM: yes TM->>RM2: xa_prepare RM2-->>TM: yes alt 全部回复 yes Note over TM,RM2: 第二阶段 Commit TM->>RM1: xa_commit TM->>RM2: xa_commit else 存在 no Note over TM,RM2: 第二阶段 Rollback TM->>RM1: xa_rollback TM->>RM2: xa_rollback end-
XA 协议是由 X/Open 组织提出的分布式事务处理规范,主要定义了事务管理器 TM 和局部资源管理器 RM 之间的接口。
-
分布式事务的两阶段提交是把整个
事务提交分为 prepare 和 commit两个阶段。第一阶段,事务协调者向事务参与者发送 prepare 请求,事务参与者收到请求后,如果可以提交事务,回复 yes,否则回复 no。
第二阶段,如果所有事务参与者都回复了 yes,事务协调者向所有事务参与者发送 commit 请求,否则发送 rollback 请求。
-
JTA实现分布式事务的两个阶段。
第一阶段首执行 XA 开启、执行 sql、XA 结束三个步骤,之后直接执行 XA prepare。
第二阶段执行 XA commit/rollback。
-
使用XA 模式前提是:数据库对 XA 协议的支持。atomikos、seata、bitronix是作为
全局的调度者的角色参与到方案中。 -
seata 是阿里推出的一款开源分布式事务解决方案,目前有 AT、TCC、SAGA、XA 四种模式。
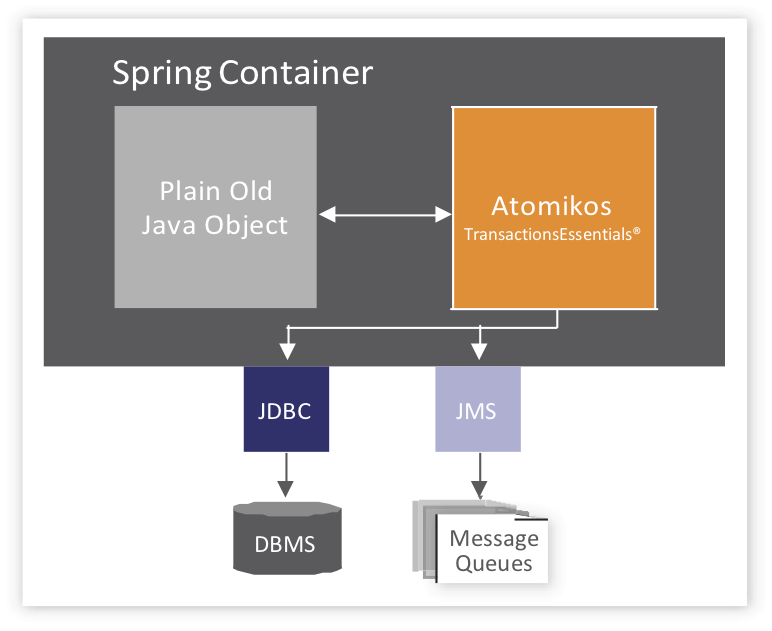
atomikos 框架浅析
atomikos TransactionsEssentials
Manage your distributed transactions and protect your mission critical data.
轻量、开源、免费、收费版本(ExtremeTransactions)提供技术支持(14500 €/year)。
轻量是指不依赖应用服务器(Websphere、Jboss)。
Insight atomikos 事务管理
insight 思路是顺着 javax.transaction.xa.XAResource 定义的接口来看协调者做了哪些工作。主要侧重XA Api操作步骤,涉及到XA 协议的状态管理、嵌套事务等实现,不在此处关注。
事务开启
参考:com.atomikos.datasource.xa.XAResourceTransaction#resume
关键类:
- com.atomikos.icatch.Participant (XAResourceTransaction)
A participant for (distributed) two-phase commit of composite transactions. Implementations can be added as a 2PC participant in the icatch kernel
- com.atomikos.jdbc.AtomikosConnectionProxy
拦截 JdbcConnection 的操作,根据操作选择纳入协调器管理、开启XA事务或者阻止在XA事务中直接commit等。
注意:不同于普通的 Jdbc 事务,JTA的事务开启并不是在 AbstractPlatformTransactionManager#doBegin 方法中调用。设想多个数据源,到底是应该开启哪个的事务,只有真正发生 Jdbc 操作时,才会判断并开启XA事务,同时把该数据源纳入到协调器中。
事务提交(两阶段提交)
根据执行情况分为 prepare + commit、 prepare + rollback、 rollback。
参考: com.atomikos.icatch.jta.UserTransactionImp#commit
关键类:
- com.atomikos.icatch.CompositeTransaction
Represents a nested part of a global composite transaction. 委托协调器发起事务的提交。
- com.atomikos.icatch.imp.CoordinatorImp
protected void terminate(boolean commit) throws Exception { synchronized (fsm_) { if (commit) { if (participants_.size() <= 1) { // 如果只涉及到单数据库的操作,那么简化为普通的jdbc操作,直接commit commit(true); } else { // 对多个participant 发起prepare操作,第一阶段协调 int prepareResult = prepare(); // make sure to only do commit if NOT read only if (prepareResult != Participant.READ_ONLY) commit(false); } } else { // 或者直接回滚,应用逻辑出错,不需要协调 rollback(); } } }- com.atomikos.icatch.imp.ActiveStateHandler
protected int prepare() throws Exception {
	Vector<Participant> participants = getCoordinator().getParticipants();
	CoordinatorStateHandler nextStateHandler = null;
	// 省略其他判断...
	try {
		getCoordinator().setState(TxState.PREPARING);
		result = new PrepareResult(participants.size());
		Enumeration<Participant> enumm = participants.elements();
        // 分别对 Participant 发起prepare(), 默认是同步提交,可以启用线程池异步发起prepare()
		while (enumm.hasMoreElements()) {
			Participant p = (Participant) enumm.nextElement();
			PrepareMessage pm = new PrepareMessage(p, result);
			// 省略其他判断...
			getPropagator().submitPropagationMessage(pm);
		} // while

		result.waitForReplies();
		boolean voteOK = result.allYes();
		if (!voteOK) {
			try {
				rollbackWithAfterCompletionNotification(new RollbackCallback() {
					public void doRollback() {
						rollbackFromWithinCallback(true, false);
					}
				});
			}
		}
	} catch (RuntimeException runerr) {
		throw new SysException("Error in prepare: " + runerr.getMessage(), runerr);
	}

	return ret;
}
-
-
mybatis 参数封装和处理相关方法梳理
- 1. ParamNameResolver#getNamedParams
- 2.DefaultSqlSession#wrapCollection
- 3. DynamicSqlSource#getBoundSql
- 4. DefaultParameterHandler#setParameters
- 附:关于JDK8 Parameter的使用
清单目的:在使用到mybatis 冷门特性时候,可以快速参考查阅
1. ParamNameResolver#getNamedParams
方法入参封装,根据方法参数的个数,有不同的处理方法。
参数个数 处理方法 备注 0 return null 1 (非特殊类型 or @Param) return 原始入参对象 需要特别注意,如果在动态SQL中使用,则不能为String、Integer等简单类型。 >=2 return HashMap name即参数的name,通过@Param指定的name或者JDK反射得到的name。 方法中使用到的方法参数,是在mybatis 启动过程中加载对应method并解析得到的。需要主要到
@Param和JDK8 Parameter对mybatis 解析的影响。如果使用JDK8,对于接口的参数,是可以获取到参数编写的命名,否则得到参数name类似”arg0”
2.DefaultSqlSession#wrapCollection
针对第1步中的封装结果,如果是单个参数的情况,则需要针对数组和集合进行单独封装。
参数类型 处理方法 备注 Collection return HashMap(“collection”, object) 固定name=collection List return HashMap(“collection”, object, “list”, object) 固定name=list Array return HashMap(“array”, object) 固定name=array 3. DynamicSqlSource#getBoundSql
此时,需要根据入参把动态sql转化为StaticSqlSource,再将StaticSqlSource 转换为sql String。
上述参数封装的结果,就是把各种入参对象整合到单个对象里(
DynamicContext),方便统一读取(MetaObject)。后续的处理中,直接使用DynamicContext 获取参数,不再使用原始的参数。
ForEachSqlNode 转化为StaticSqlSource示例
foreach 表达式的解析,是把collection拆散的过程,可以理解为把集合类型的参数拆成n个参数。
# foreach 表达式静态转换示例
# DynamicContext 中会新增(__frch_item_0:id1, __frch_item_1:id2)的参数
# org.apache.ibatis.scripting.xmltags.ForEachSqlNode#apply
select xxx from candy  WHERE id IN ( #{__frch_item_0},  #{__frch_item_1} );
StaticSqlSource 转换为BoundSql
StaticSqlSource 转换为BoundSql,也就是转为真正的SQL的过程。SQL中占位符只存在?符号。
上述的foreach 最终的结果为
# An actual SQL String
# 占位符对应的参数,存储到 org.apache.ibatis.mapping.BoundSql#parameterMappings
select xxx from candy  WHERE id IN ( ?, ? );
4. DefaultParameterHandler#setParameters
以BoundSql 为基础,调用java.sql.PreparedStatement#setString,完成JDBC调用。
附:关于JDK8 Parameter的使用
从方法中获取参数的命名,是个麻烦的事情,特别是从接口中。JDK8 以后支持这种操作,不过需要编译参数启用。
如果使用maven,那么可以加上如下的配置,启用这个特性。
<build>
    <plugins>
        <plugin>
            <groupId>org.apache.maven.plugins</groupId>
            <artifactId>maven-compiler-plugin</artifactId>
            <version>3.7.0</version>
            <configuration>
                <source>1.8</source>
                <target>1.8</target>
                <compilerArgs>
                    <arg>-parameters</arg>
                </compilerArgs>
            </configuration>
        </plugin>
    </plugins>
</build>
-
因为慢 SQL 导致的线上服务不可用案例分析
问题场景
记一次线上事故排查过程,事故的根本原因是慢SQL 查询。但线上问题的情况以及监控工具指标表现,并没有直接指向慢SQL 的问题,排查的过程值得记录和反思。
线上事故
系统使用人员反馈系统的操作卡顿或者不可用,数据列表查询有问题,后端请求响应非常慢。
初步问题排查分析
首先,第一反应应该是 web-server 出问题或者 mysql-server 出问题。比如CPU打满或者内存打满,导致的服务不可用。
通过监控工具查看应用服务器的指标、JVM指标以及数据库服务器CPU、磁盘的指标,都处于正常范围。
然后,猜想是程序、功能方面的问题,通过查询mysql 状态,并没有发现有查询的慢SQL。查询JVM线程,没有突增。
那么问题是出现在哪呢?
问题排查分析plus
上述的基础指标排除完毕,那就尝试看是否有并发锁等待、事务死锁、mysql 死锁的情况。
线程dump
通过dump JVM线程,发现有很多线程等待,前端请求线程在调用getConnection()时候,阻塞了。
java.lang.Thread.State: TIMED_WAITING (parking)
        at sun.misc.Unsafe.park(Native Method)
        - parking to wait for  <0x0a9d2f48> (a java.util.concurrent.locks.AbstractQueuedSynchronizer$ConditionObject)
        at java.util.concurrent.locks.LockSupport.parkNanos(LockSupport.java:215)
        at com.alibaba.druid.pool.DruidDataSource.pollLast(DruidDataSource.java:1487)
        at com.alibaba.druid.pool.DruidDataSource.getConnectionInternal(DruidDataSource.java:1086)
        at com.alibaba.druid.pool.DruidDataSource.getConnectionDirect(DruidDataSource.java:953)
        at com.alibaba.druid.pool.DruidDataSource.getConnection(DruidDataSource.java:931)
Insight getConnection()
DruidDataSource 实现线程池的机制是典型的生成者、消费者模式,通过类似BlockingQueue 来实现连接池的管理。
通过分析,是因为持有数据库连接的线程一直占用连接,导致其他需要和数据库交互的请求线程等待。这样的结果造成了系统的JVM CPU和堆栈都是正常情况,但是服务不可用。
同时,由于应用服务是受制于数据库连接池maxActive 的限制,并不会无限制创建mysql connection,导致数据库的IO链接也处于正常范围。
那么是什么请求一直在占用有限的connections?
private DruidConnectionHolder pollLast(long nanos) throws InterruptedException {
    for (;;) {
        if (poolingCount == 0) {
            try {
                long startEstimate = estimate;
                // 如果连接池的连接都在工作,那么就需要等待
                estimate = notEmpty.awaitNanos(estimate); // signal by recycle or creator
                notEmptyWaitCount++;
                notEmptyWaitNanos += (startEstimate - estimate);
            } catch (InterruptedException ie) {
                notEmpty.signal(); // propagate to non-interrupted thread
            } finally {
                notEmptyWaitThreadCount--;
            }
        }

        // 从连接池获取空闲的连接,并标记
        decrementPoolingCount();
        DruidConnectionHolder last = connections[poolingCount];
        connections[poolingCount] = null;

        return last;
    }
}
原来是update
通过导出mysql 慢查询日志,发现竟然有超长执行时间的update语句。
在一开始的排查过程中,只关注事故的表象,排查select 慢sql并没有问题,导致排查走了弯路。
UPDATE `orders` SET `order_carrier_tel`='xxx-xxx-5501' WHERE `order_carrier_name`= 'xxx';由于昨天新上的编辑功能,update 的where 条件没有索引,导致全表扫描,形成慢sql。
总结
- 敬畏每一次上线。对于关键系统的code review 是不可缺失的,一次的疏忽或者冷门功能点的问题,都会导致线上的事故。
- 90%的问题是出在数据库交互过程中。平时的代码编写,SQL编写一定要慎重。只有面对线上环境的请求和庞大的数据量时,才是真正的考验。
-
漫游 Redis SORTGET combination
起因
阅读Retwis-J(Redis版本的Twitter )设计文档过程中,对于Redis join 方案的实现比较感兴趣,因此记录下SORT/GET 的神奇用法。以备不时之需。
Retwis-J 设计方案
A common problem with any store is dealing efficiently with normalized data.
A simple approach would be simply iterate through the list and load each post one by one but clearly this is not efficient as it means a lot of (slow) IO activity between the application and the database.
The best solution in such cases it to use the SORT/GET combination which allows data to be loaded based on its key - more information here. SORT/GET can be seen as the equivalent of RDBMS join.
SORT/GET combination 使用说明
在某些情况下,获取实际对象而不是它们的ID(object_1、object_2和object_3)更有用。
可以使用以下命令,根据列表中的元素获取外部数据:
SORT mylist BY weight_* GET object_*获取外部hash 字段数据的命令:
SORT mylist BY weight_*->fieldname GET object_*->fieldname。通过->来标识hash key 和hash 字段。命令例子
redis> lpush timeline 1 2 3
redis> lrange timeline 0 -1
1) "3"
2) "2"
3) "1"

redis> set post_1 10
redis> set post_2 20
redis> set post_3 30
redis> sort a get o_*
1) "10"
2) "20"
3) "30"

redis> set foo_1 100
redis> set foo_2 200
redis> set foo_3 300
redis> sort timeline get post_* get foo_*
1) "10"
2) "100"
3) "20"
4) "200"
5) "30"
6) "300"
Retwis-J join示例
Method
convertPidsToPostsshows how these classes can be used load the posts by executing a join over a hash.Spring Data provides support for the SORT/GET pattern through its
sortmethod and theSortQueryandBulkMapperinterface for querying and mapping the bulk result back to an object.// spring-data-redis 提供的StringRedisTemplate 支持上述sort 的combination 操作 // String pid = "pid:*->"; SortQuery<String> query = SortQueryBuilder.sort(key).noSort().get(pidKey).get(pid + uid).get(pid + content).get(pid + replyPid).get(pid + replyUid).get(pid + time).limit(range.begin, range.end).build();// 查询结果处理 BulkMapper<WebPost, String> hm = new BulkMapper<WebPost, String>() { @Override public WebPost mapBulk(List<String> bulk) { Map<String, String> map = new LinkedHashMap<String, String>(); Iterator<String> iterator = bulk.iterator(); // 对应上述SORT/GET 命令的结果集,通过遍历得到对应的结果 String pid = iterator.next(); map.put(uid, iterator.next()); map.put(content, iterator.next()); map.put(replyPid, iterator.next()); map.put(replyUid, iterator.next()); map.put(time, iterator.next()); return convertPost(pid, map); } }; List<WebPost> sort = template.sort(query, hm);参考
-
okhttp Read timed out 重试方案解疑
疑问
使用 okhttp 抓取数据场景中,偶发Read timed out异常。正常的做法是增加重试机制。
在查看文档过程中,发现okhttp 默认会注册
RetryAndFollowUpInterceptor ,字面上是支持重试的。那么,为什么timed out 异常不会重试,RetryAndFollowUpInterceptor 是干啥的?
RetryAndFollowUpInterceptor分析
能做什么
This interceptor recovers from failures and follows redirects as necessary.
-
add authentication headers
// 针对未授权的异常(HTTP Status-Code .401: Unauthorized),尝试调用authenticate(), 继续请求操作 client.authenticator().authenticate(route, userResponse); -
follow redirects
/** * 针对重定向的异常 * HTTP Status-Code 301: Moved Permanently. * HTTP Status-Code 302: Temporary Redirect. * HTTP Status-Code 303: See Other. * 通过重新构造request情况,达到自动跳转的目的 */ String location = userResponse.header("Location"); HttpUrl url = userResponse.request().url().resolve(location); -
handle a client request timeout(稀有场景)
case HTTP_CLIENT_TIMEOUT:
// 408's are rare in practice, but some servers like HAProxy use this response code. The
// spec says that we may repeat the request without modifications. Modern browsers also
// repeat the request (even non-idempotent ones.)
// 注意:此处的Timeout 不是上述的SocketTimeout...
参考:okhttp3.internal.http.RetryAndFollowUpInterceptor#followUpRequest
不能做什么
遇到如下的异常:ProtocolException、
InterruptedIOException、SSLHandshakeException、CertificateException称之为:
the failure is permanent。if (e instanceof InterruptedIOException) { return e instanceof SocketTimeoutException && !requestSendStarted; }参考:okhttp3.internal.http.RetryAndFollowUpInterceptor#recover
SocketTimeoutException 方案
-
根据情况,适当调整timeout设置
new OkHttpClient.Builder() .connectTimeout(10, TimeUnit.SECONDS) .writeTimeout(5, TimeUnit.SECONDS) .readTimeout(10, TimeUnit.SECONDS) .build(); -
增加重试机制,对网络的波动进行容错
实现Interceptor接口,对SocketTimeoutException catch 重试。
总结
通过上述的分析,RetryAndFollowUpInterceptor 解决的是http 协议应用层重试问题,而read timed out 通讯协议层的问题。解决timeout 对于RetryAndFollowUpInterceptor 不是职责内的功能。
其他
okhttp3.Interceptor 注册
Response getResponseWithInterceptorChain() throws IOException {
    // Build a full stack of interceptors.
    List<Interceptor> interceptors = new ArrayList<>();
    // 自定义的拦截器优先执行
    interceptors.addAll(client.interceptors());
    interceptors.add(retryAndFollowUpInterceptor);
    interceptors.add(new BridgeInterceptor(client.cookieJar()));
    interceptors.add(new CacheInterceptor(client.internalCache()));
    interceptors.add(new ConnectInterceptor(client));
    if (!forWebSocket) {
      interceptors.addAll(client.networkInterceptors());
    }
    // 真正的发起网络请求
    interceptors.add(new CallServerInterceptor(forWebSocket));

    Interceptor.Chain chain = new RealInterceptorChain(interceptors, null, null, null, 0,
        originalRequest, this, eventListener, client.connectTimeoutMillis(),
        client.readTimeoutMillis(), client.writeTimeoutMillis());
    // 调用链发起调用
    return chain.proceed(originalRequest);
}
参考
-